Example 2 - Setting Alignment Options
This example demonstrates how you can control the storage density of your EXI files by changing the byte alignment and compression options.
- What Example 2 Demonstrates
- How to Use Example 2
- Code Highlights
What Example 2 Demonstrates
Byte alignment has a significant impact on the overall size of an EXI file.
XML, by definition, is a text-based standard. The smallest unit of storage is a byte (for a single character), even if the actual value could be expressed using a smaller space. For example, if the value were 1 or 0, an XML file would store it as a byte value, even though it could be stored in a single bit.
EXI files, by default, are bit-packed. Information is stored using the fewest number of bits required, regardless of the byte boundaries. Conceptually, this allows 8 Boolean values to be stored in a single Byte, versus 8 separate bytes for the letters T or F. In a large data set, this can provide significant savings.

The byte-aligned option encodes the document content aligned on byte boundaries. This usually results in EXI streams that are larger than the bit-packed equivalent. However, these files can be viewed with a text editor for troubleshooting encoding and decoding routines.
The pre-compression option performs all transformations on the XML file except for the final step of applying the DEFLATE algorithm. The primary purpose of pre-compression is to avoid a duplicate compression step when compression capability is built in to the transport protocol.
When the compress option is selected, the W3C specification states explicitly that alignment options are ignored, and the file is processed per the specification to achieve the smallest possible size.
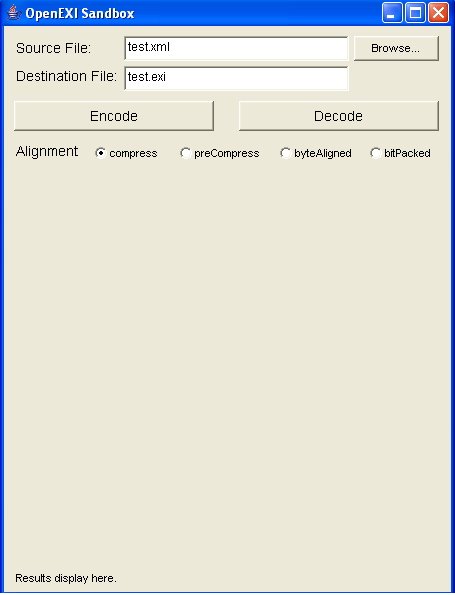
Example 2 adds the Alignment radio button group to the UI. By changing the alignment option, you can encode files and compare their finished size. It can be interesting to peek inside the output files using a text editor to see their relative readability. Since compression and alignment are mutually exclusive, it makes sense to include compression in the Alignment radio button group.
How to Use Example 2
To install and run Example 2:
- Download and expand OpenEXI_Example2.zip. This zip archive contains the compiled example application classes and Java source code. Expanding the file creates a directory of name "OpenEXI_Example2".
- From command line, move into the "OpenEXI_Example2" directory.
- Enter the command:
java -jar OpenEXI_Example2.jar
To encode an XML file to EXI:
- Click Browse... to select an XML file to encode. The selected file name appears in the Source File field. A suggested name is displayed in the Destination File field, but you can edit the location or file name according to your needs.
- Use the radio buttons to choose an alignment type.
- Click Encode.
To decode an EXI file to XML:
- Click Browse... to select an EXI file to decode. The selected file name appears in the Source File field. A suggested name is displayed in the Destination File field, but you can edit the location or file name according to your needs.
- Set the Alignment to the same alignment used to encode the file.
- Click Decode.
Code Highlights
Complete, commented source code is included in the src directory in OpenEXI_Example2.zip. This section highlights the important updates in each iteration as the examples build on one another.
EncodeEXI
This example adds a string argument for the alignment type.
    public void encodeEXI(
        String sourceFile,
        String destinationFile,
        String alignment
    )
This allows you to try the different settings and see how they impact the size of the file using your own data. In practice, you will already know the best setting and be able hard code the optimal value in your custom routine.
The code itself is unremarkable. Alignment is bit-packed by default. You can change the alignment using the alignment radio buttons in the user interface. The radio button label is passed as a String argument to EncodeEXI(). Based on the String value, the alignment type is passed to the Transmogrifier using an enumerated value.
            Transmogrifier transmogrifier = new Transmogrifier();

            // Set alignment and compression
            if (alignment.equals("bitPacked"))
                    transmogrifier.setAlignmentType(AlignmentType.bitPacked);
            if (alignment.equals("compress"))
                    transmogrifier.setAlignmentType(AlignmentType.compress);
            if (alignment.equals("preCompress"))
                    transmogrifier.setAlignmentType(AlignmentType.preCompress);
            if(alignment.equals("byteAligned"))
                    transmogrifier.setAlignmentType(AlignmentType.byteAligned);
DecodeEXI
When you decode a file, you need to set the alignment to match the settings when the file was encoded. The code looks exactly the same as in EncodeEXI(), except it sets the value on the EXIReader rather than the Transmogrifier.
    public void decodeEXI(
            String sourceFile,
            String destinationFile,
            String alignment
    )
.
.
.
            EXIReader reader = new EXIReader();

            // Set alignment and compression
            if (alignment.equals("bitPacked"))
                    reader.setAlignmentType(AlignmentType.bitPacked);
            if (alignment.equals("compress"))
                    reader.setAlignmentType(AlignmentType.compress);
            if (alignment.equals("preCompress"))
                    reader.setAlignmentType(AlignmentType.preCompress);
            if(alignment.equals("byteAligned"))
                    reader.setAlignmentType(AlignmentType.byteAligned);
This example demonstrated how to set the alignment for more or less data compression. Example 3 shows how to implement additional options to control the type of information that is preserved and how it will be stored.
Updated August 23, 2013.
Tutorial by Dennis Dawson with Takuki Kamiya of Fujitsu Laboratories of America.
